 Trim t r
Tool summary :
- Can cut segments from arcs and circles and ellipses as well as lines .
- A circle or ellipse that is cut using Trim becomes an arc.
- See (on this page):
Also see :
page 1 | contents | edit > | edit
| VIDEO
|

|
Trim is used to remove segments of circles and lines.
|
|
| VIDEO
|

|
Edit > Trim can be used to trim multiple segments from a selection of multiple lines and/or arcs/circles/ellipses.
|
|
| VIDEO
|

|
Segments of intersecting circles are removed, making the circles into arcs.
|
|
| VIDEO
|

|
An ellipse and a line that intersects that ellipse are selected for trimming. The segment of the ellipse that is above the intersecting line is selected to be trimmed. Once that segment is removed, the ellipse becomes an arc. A second trim operation removes segments of a line that intersect an arc.
|
|
- The following example helps to explain the video and vice-versa.
|
|
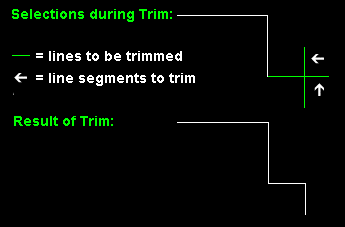
Two green lines were selected to be trimmed. The VIDEO shows a result that is similar to the result that is shown here.
|
- At a minimum, at least two intersecting lines must be selected for trimming. You can select more than two lines.
|
|
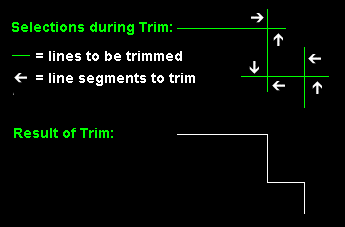
Four green lines were selected to be trimmed. Six line segments are trimmed from these four lines. Arrows point to the segments that were selected to be trimmed.
|
page 1 | contents | edit > | edit | top
 Step-by-step instructions (also see the examples ) :
The following instructions assume that you are using a 3-button mouse.
1 . Invoke Trim using any one (1) of the following methods:
Method 1 : Click the Trim icon. The icon can be taken from the group named ' Edit ' and placed on a toolbar (classic) or the ribbon (lightning).
Method 2 : If " Drawing Editor layout style " is ' Classic ', you can use the menu system to choose Edit > Trim .
Method 3, 4 or 5 : Trim can also be invoked using a keyboard shortcut , the context menu , or a mode . For the ' Lightning ' layout style, configuration of the interface is done using Customize Interface .
2 . Select - Pan - Menu mouse bindings become active. The status line prompts you to select lines and/or arcs and/or circles and/or ellipses for trimming.

|
 no key pressed no key pressed
|
|
|
|

|
 Shift key pressed Shift key pressed
|
|
|
|

|
 Ctrl key pressed Ctrl key pressed
|
2a : Draw an area box or use Select + to select lines and/or arcs and/or circles and/or ellipses to trim. At least two objects must be selected. Use Select- if you want to deselect objects. Press Enter or right-click ( Menu ) and choose " OK " when you are done selecting objects.
Alert notification: If you select non-intersecting objects such as two parallel lines, Trim alerts you that the lines are parallel. When you press " OK " to dismiss the alert dialog, the trim operation ends.
3 . Locate- Pan -Return mouse bindings become active. The status line prompts you to select segments to trim. On Line becomes the active point locator.
3a : Place your mouse pointer (  ) so that the point location target (
  ) snaps to one of the segments that you want to trim off of one of the objects you selected in step 2a, then left-click ( Locate ). That segment disappears immediately.
3b : Repeat step 3a as many times as you like to trim additional segments from the selected lines, arcs, circles or ellipses. Right-click ( Return ) when you are done trimming.
Alternatives to Return: If you left-click ( Locate ) a segment that is not a segment of one of the objects you selected in step 2a, the result is the same as if you had done a right-click ( Return ). The trim operation ends. Pressing Esc is another alternative to right-click ( Return ).
Tip: Any segments removed using this procedure can be retrieved (one segment at a time, in reverse-order of their removal) by using Edit > Undo ( Ctrl+z ).
page 1 | contents | edit > | edit | top
 Trim ( Drawing Editor > t r )
 )
)
 Examples and videos (also see the step-by-step instructions ) :
 Step-by-step instructions (also see the examples ) :
) so that the point location target (
) snaps to one of the segments that you want to trim off of one of the objects you selected in step 2a, then left-click ( Locate ). That segment disappears immediately.


